| |
|
Opening resource files
To open a resource file:
1 Choose File > Open.
To open a resource file that you have opened recently, choose File > Open Recent, then choose the resource file. To change the number of recently opened resource files listed on this menu, update your "Number of files to list" preference.
You can also open a resource file by dragging it into the FirstClass Designer window.
2 Locate and open the resource file you want to change.
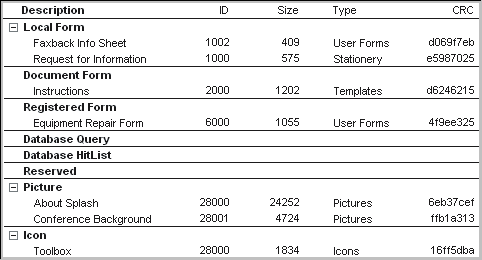
The list of resources contained in the resource file opens.
The resource list shows:
To sort by a particular column, click that column heading.
Creating resource files
Usually, the easiest way to create a resource file is to copy an existing one and modify it. However, you can create a new resource file from scratch. To do this:
1 Choose File > New.
2 Select the folder in which you want to save the resource file, and specify a file name.
A new resource list opens for this resource file.
Updating resource files
You can add pictures, icons, and sounds to the resource file, and add or customize forms. When you are finished customizing the resource file, choose File > Save to save your changes.
To undo all changes you have made to the resource file in the current session, choose File > Revert to Original. The resource file reverts to the version that you started with at the beginning of your session.
Saving resource files automatically
To make FirstClass Designer save your resource file periodically as you work on it, select the "Autosave" preference. Specify the time between saves at "Interval".
The temporary file created when Designer does an automatic save begins with $~. If your system goes down while you are working in FirstClass Designer, you can rename this file to act as a replacement for your resource file. This will save all the changes you made prior to the latest automatic save.
Creating backups
To make FirstClass Designer create a duplicate of a resource file whenever you open it, select the "Create backup" preference. The duplicate has a .bak extension.
This allows you to discard all changes you made in your current session and revert to the version of the resource file with which you started the session.
How backups affect disk space usage
If you are short on disk space, consider how much extra space will be required when these preferences are selected. Selecting one of these preferences causes the resource file to require twice as much disk space. Selecting both preferences causes the resource file to require three times as much disk space.
Types of resources
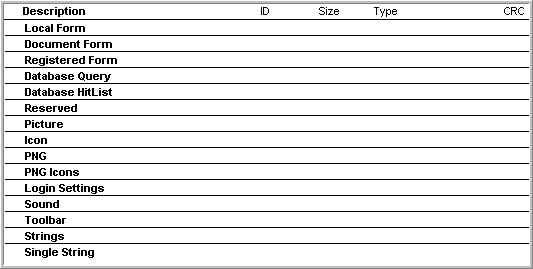
The FirstClass resources that you can work with in a resource file are:
To use picture, custom icon, and sound resources in a resource file, you must first import them into the resource file or store them on your server.
If FirstClass Designer doesn't recognize file types
When you import resources into resource files from other files, FirstClass Designer recognizes and automatically handles the basic file types supported by the FirstClass client. You may have a FirstClass Application Services application or client extension that handles additional resource types. You can import these resources, too.
If FirstClass Designer doesn't recognize the file type of a resource you are importing, you are asked to supply the Mac 4-character resource type that applies. No attempt is made to convert these files, and a separate category, based on the resource type you provided, is created for them.
Copying resources between resource files
To copy a resource from one resource file to another:
1 Open the resource file containing the resource (the source resource file).
2 Open the resource file to which you want to copy the resource (the target resource file).
3 Select the resource in the source resource file's resource list.
To select more than one resource at a time, press Control (Windows) or Command (Mac) while you click each one.
4 Drag the resource from the source to the target resource file while pressing Control (Windows) or Option (Mac).
If you drag the resource without pressing Control/Option, the resource is moved rather than copied.
If you don't have room on your screen to display both resource lists at once, you can use the standard Copy and Paste commands instead of dragging.
Handling duplicate resources
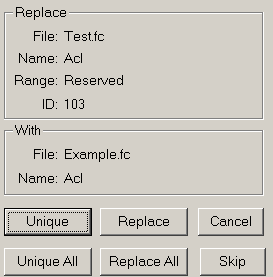
When you import resources or copy them between resource files, FirstClass Designer may encounter a resource already in the resource file that is the same type of resource, with the same resource ID, as a resource you are importing. In this case, FirstClass Designer will do one of the following, depending on your "Duplicate resources" preference:
• assign the resource being imported a unique resource ID
• replace the existing resource with the resource being imported
• ask you how to handle the resource being imported.
If you are asked how to handle the resource being imported, you will see a dialog like this:
| ||||||||||||||||||||||||||||||||||||||||||||


