| |
|
About customizing forms
FirstClass contains a set of standard forms that are available to all users. Copies of these forms are contained in the Example.fc resource file that ships with FirstClass Designer. You can use these copies as bases for your customization.
Each form has a unique resource ID. FirstClass uses this ID to ensure, for example, that a message form used by a recipient to view a message is the same as the form used by the sender to create the message. When you open Example.fc in FirstClass Designer, you see the resource IDs for all the standard forms.
Editing forms
To edit a form:
1 Open the resource file containing the form in FirstClass Designer.
2 Double-click the form in the resource list to open it.
3 Edit the form as required.
Moving the split bar
The split bar separates the message or document envelope from the body. You can drag the split bar up and down just as you do in the FirstClass client.
You can also have forms that consist entirely of an envelope (if you do not want users adding free-form text in a body) or entirely of a body (if there is no information that makes sense in fields, or you want to hide the envelope by default).
Customizing the FirstClass Login and Logoff forms
You can create customized versions of the FirstClass Login and Logoff forms. As for all other standard forms, copies of these forms are contained in the Example.fc resource file, and you can customize these copies. Be sure to keep the same resource IDs as the originals.
You can't change the icons or titles of these forms. Any changes you make to these elements will not show up in the client.
Creating new forms by copying existing forms
The easiest way to create a new form is to copy an existing form that has many of the fields you need. You can copy an existing form from one resource file to another just as you would copy any other resource.
Creating new forms from scratch
To create and open a new form:
1 Use FirstClass Designer to open the resource file to which you want to add the form.
2 Choose Form > New, then the category to which you want to add the form.
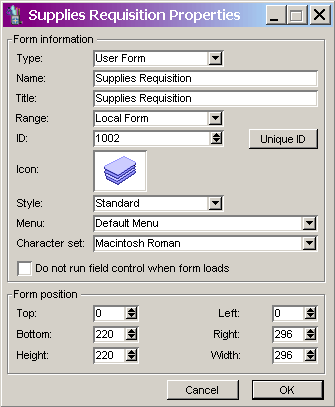
For descriptions of form categories, see the information on the "Range" field below.
3 Add fields to the form.
4 Close and save the form.
5 Set form attributes.
This is where you name your form and give it a resource ID.
Adding background colors to forms
If you add a background color or picture to a form, preview the completed form to be sure the background doesn't obscure the fields.
You can give your form a solid color background or a gradient color that changes gradually to a second color from the top to the bottom of the form.
To add a background color:
1 Go to the Sizes/Colors tab of the Field Attributes form.
Make sure no fields are selected.
2 Update "Color" in the Background section of this tab.
Select whether you want a solid or gradient color. Then choose the background color. If you choose gradient, you are also asked to select the color that will appear at the bottom of the form.
Adding background pictures to forms
You can add a picture to the background of your form. This picture can appear once, in the upper left corner, or be tiled.
The form background is actually a pointer to the selected picture resource. Because it is a pointer, not a copy of the actual resource, the resource must be available when users view the form. This means that if you select a custom picture, this custom resource must stay in the resource file or be stored on the server.
To add a background picture:
1 Go to the Sizes/Colors tab of the Field Attributes form.
Make sure no fields are selected.
2 Update "Image" in the Background section of this tab.
To display the picture just once, choose Image. To tile the picture, choose Tiled Image. Then specify the picture's resource ID and type (to be sure you are selecting the right resource, because there can be different types of resources with the same resource ID).
Testing forms
To see how a form will appear to your users, choose Form > Preview Form. This command displays the form without the field boundaries that are displayed when the form is in edit mode. While previewing the form, you can enter data into fields, click buttons, and display selection lists. You can't close the form. To quit preview mode, choose Form > Preview Form again.
To see what a form will look like to users who don't have permission to edit it, choose Form > Protected Mode. To quit protected mode, choose this command again.
Ways to save your work
To avoid losing your work, you should save the form frequently. You can save forms in the following ways:
Setting form attributes
When you close a new form, the Properties (Windows) or Info (Mac) window opens. Assign form attributes in this window.
To access this window for an existing form, select the form, then choose File > Properties (Windows) or Get Info (Mac).
| ||||||||||||||||||||||||||||||||||||||||||||||||||||||||||||||||||||||||||||||||||||||||||||||||

